
Making a Pierced Pendant
Posted by Erin Bullock on
Sometimes, I get to work on a project that I really love for someone else. A lady fell in love with my labradorite butterfly wing necklaces, but she wanted the pendant to be a little smaller. My solution was to make the back of the pendant look like a butterfly wing. This is how I did it.
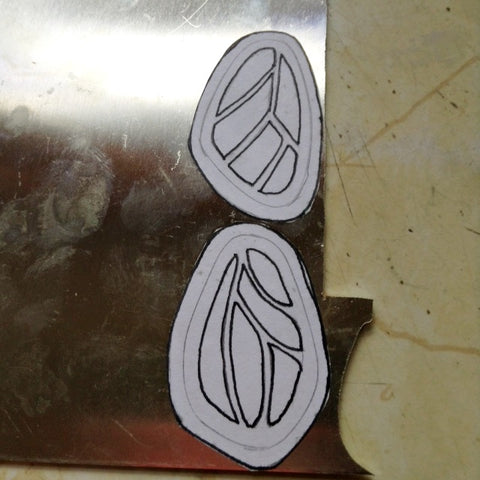
I traced around each stone lightly with a pencil. Then, because drawing is not my strongest suit, I looked up images of butterfly wings. That gave me the jumping off point I needed to freehand the segments of the wings. I refined the lines and darkened in the lines I wanted to cut out. The edge of the pendant is added and also darkened in, so I can see where I'm going with my saw blade.

In order to get inside each section, I have to drill holes with a small drill bit. The blade is threaded through each drill hole, each section is hand cut, and then all those little edges have to be sanded and filed. This takes some time, as moving from section to section requires re-threading the metal each time.

This is what the piece looks like after the sections have been removed. The back of the stone will show through this, so make sure the back of your stone isn't ugly. Let's face it - sometimes, they aren't as nice as the front. :D I soak the paper off in some water - it slides right off - and then the glue needs to be wiped off. I use Elmer's glue sticks - the glue is water soluble and cleans up easily.

Just a little glamour shot with the stone and the back plate. That stone, though.
Am I right?

The bezel is formed around the stone and soldered. I use hard solder on bezel joins. Because this back plate has so much open space, it will heat quickly. Be careful - you don't want to melt one of the supporting "veins". I think I used hard solder here.

I chose a simple bail - I like the stone to stand out, and I like two separate chains on a pendant so the clasp doesn't slide around to the front constantly. This lady also likes a simple look, so I wasn't going to be all fancy here. Obviously, in between steps, I'm doing some sanding and pickling. There was a spot that needed to be ground off on the back - some flux stuck to the back and wouldn't come off with pickle and sanding.

After much filing, sanding, pickling, tumbling, and polishing, this is what the finished piece looked like. I showed the customer the sterling silver chains I had available, and she chose this lovely cable chain in the 18" length for her necklace.The stone is amazing, and the piercing on the back is simple and elegant and showcases the stone perfectly. The customer was thrilled to death with the piece, and so was I.
Share this post
- 0 comment
- Tags: butterfly wing necklace, Custom work, handmade jewelry, heartsabustin, labradorite, modern bohemian jewelry, sterling silver, wilmington nc